Tel : 86-0755-89999957 /
  Email : colin@aohuadz.com


What we’ve learned from fixing hundreds of installation mistakes – and how you can get it right the first time.
At AOHUA, we’ve been called to more “failed connector” scenes than we can count. About 70% of the time, the connector itself wasn’t defective. The problem was how it was installed.
A waterproof connector is only as reliable as its installation. A tiny gap, an over‑tightened seal, or a wire inserted one centimeter too shallow can turn an IP68 connector into a water pump that slowly pulls moisture inside.
Today, we’re sharing our complete field‑tested installation guide. Follow these seven steps, and you’ll avoid the most common mistakes we see year after year.
Before You Begin: What You’ll Need
-
Wire strippers (calibrated for your cable gauge)
-
Crimping tool (if using crimp contacts)
-
Torque wrench or hex key (if specified)
-
Clean, lint‑free cloth
-
Magnifying glass or good lighting (for inspecting contacts)
-
Your connector’s installation drawing (keep it nearby)
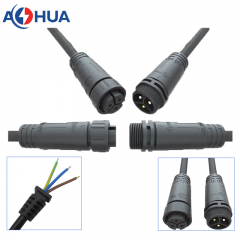
Step 1: Choose the Right Cable – And Prepare It Correctly
Mistake we see often: Using a cable that is too thin or too thick for the connector’s cable gland. A thin cable leaves a gap; a thick cable crushes the seal.
Correct way:
-
Match your cable outer diameter (OD) to the connector’s specified range. Most [Company Name] connectors accept 4mm to 8mm OD, but always check the datasheet.
-
Use round, jacketed cable – not ribbon or flat cable.
-
Do not wrap tape or heat shrink over the jacket at the gland area; it creates an uneven surface.
Pro tip from our shop: When in doubt, send us a cable sample. We’ll verify fit before you order.
Step 2: Strip the Wire to the Exact Length – Not “About This Much”
Mistake we see often: Installers strip too much insulation, exposing bare wire inside the sealing zone. Water then travels along the wire strands and into the connector.
Correct way:
-
Follow the installation drawing’s strip length – typically 5–8mm for most our connectors.
-
Use a precision stripper that does not nick the copper strands. Nicks create weak points that break under vibration.
-
After stripping, twist the strands gently (if using stranded wire) to keep them together.
Real example: A customer once returned 50 “defective” connectors. We cut one open and found bare copper extending past the seal. The installer had stripped 15mm instead of 6mm. The connectors were fine; the installation was not.
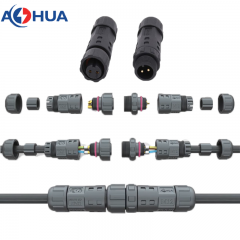
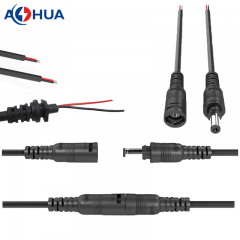
Step 3: Insert the Cable Until It Reaches the Hard Stop
Mistake we see often: Pushing the cable only until it “feels tight” – but leaving a 2mm air gap before the internal stop.
Correct way:
-
Most AOHUA connectors have an internal shoulder. Insert the cable until you feel it bottom out.
-
Mark the cable jacket at the connector entry point with a marker. After insertion, verify that the mark hasn’t moved.
Why this matters: If the cable isn’t fully seated, the compression gland seals against the insulation, but the contact pins may not align properly. Over time, vibration causes intermittent connection.
Step 4: Crimp or Solder Contacts – Then Inspect Every One
Mistake we see often: A cold solder joint, or a crimp that pulls apart with light tug.
Correct way for crimp contacts:
-
Use the manufacturer‑recommended crimp tool (not a generic one).
-
Crimp to the specified height (in mm) – not just “tight enough.”
-
Perform a pull test on a sample: the wire should break before the crimp gives.
Correct way for solder contacts:
-
Use rosin‑core electronics solder – not plumbing solder.
-
Heat the contact, not the solder. Let the solder flow into the joint.
-
Inspect under magnification: a good joint is shiny and smooth; a dull or grainy joint is a cold solder.
Our rule: After crimping or soldering, inspect every contact. We do this on all our pre‑assembled harnesses, and we recommend you do the same.
Step 5: Assemble the Connector – Torque Matters More Than You Think
Mistake we see often: Hand‑tightening until it “feels snug.” One person’s snug is another person’s cracked housing.
Correct way:
-
Use a torque wrench if torque values are provided. For many [Company Name] connectors, the recommended torque is between 0.8 and 1.5 N·m (7–13 in‑lb).
-
If no torque wrench is available, tighten until the seal just begins to bulge slightly – then stop. Over‑tightening extrudes the seal and creates a leak path.
A story from the field: A solar farm technician used a 12‑inch wrench on a connector rated for finger‑tight + 1/8 turn. He cracked five housings before lunch. The replacements, installed with proper torque, are still sealed three years later.
Step 6: Perform a Simple Field Test Before Powering Up
Mistake we see often: Installing the connector, closing the panel, and turning on power – only to find a short or open circuit later.
Correct way:
-
Visual check: Look at the seal area. Is it evenly compressed? Any gaps?
-
Continuity test: Use a multimeter to verify each pin connects to the correct wire end.
-
Insulation resistance test (if you have a megohmmeter): Check between pins and from each pin to shield. A reading below 10 MΩ suggests moisture already present.
Quick tip: For outdoor installations, leave the connector unpowered for one rain cycle, then check inside for condensation before final power‑up. This catches slow leaks.
Step 7: Secure the Cable – Strain Relief Is Not Optional
Mistake we see often: The connector is tight, but the cable hangs freely, tugging on the gland every time the wind blows or someone walks by.
Correct way:
-
Use a cable tie or clamp within 150mm (6 inches) of the connector to take mechanical strain.
-
Leave a small service loop (about 50–100mm of slack) so the cable doesn’t pull tight when equipment moves.
Why this matters: Constant tugging gradually deforms the cable gland, breaking the seal over months. A simple strain relief adds years of life.
Quick Checklist: 7 Steps in One Look
| Step | Action | Common Mistake to Avoid |
|---|---|---|
| 1 | Match cable OD to gland range | Using wrong cable diameter |
| 2 | Strip to exact length | Bare wire inside seal zone |
| 3 | Insert to hard stop | Leaving an air gap |
| 4 | Inspect crimp/solder joint | Cold or weak connection |
| 5 | Use correct torque | Over‑tightening or under‑tightening |
| 6 | Test before power | Skipping continuity check |
| 7 | Add strain relief | Cable tugging on gland |
What If You’ve Already Installed a Connector? How to Check It
Not sure if a previously installed connector is sealed correctly? Here’s a simple three‑point inspection:
-
Visual: Look for cracks, gaps, or deformed seals.
-
Wiggle test: Grab the cable near the connector and gently pull/push. Does the connector move inside the gland? If yes, the gland is too loose.
-
Condensation check: After a temperature change (e.g., morning dew), look for fog inside a transparent connector housing. Moisture inside means the seal failed.
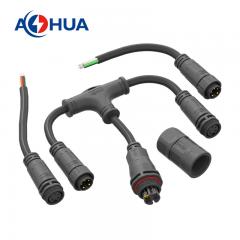
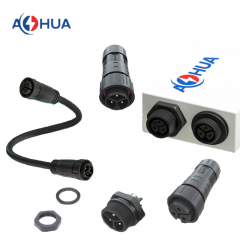
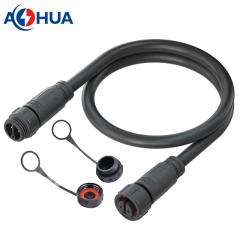
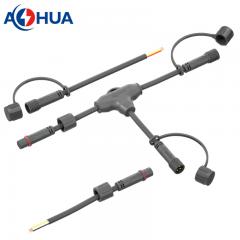
When to Choose Pre‑Assembled Harnesses
We understand that field installation is sometimes unavoidable. But if you have control over your supply chain, consider ordering pre‑assembled waterproof harnesses from AOHUA.
Benefits:
-
Eliminates 90% of installation mistakes.
-
Each assembly is tested (continuity, insulation resistance, and IP rating spot check).
-
Consistent quality across hundreds of units.
Many of our customers in EV charging and solar monitoring switched to pre‑assembled harnesses after experiencing repeated field issues. Their failure rate dropped from ~8% to under 0.5%.
FAQ
Q: Do I need special tools for your connectors?
A: For most series, you only need a wire stripper and a hex key or torque wrench. We provide the required tool specs in each product datasheet.
Q: Can I reuse a waterproof connector after disassembly?
A: It depends. If the O‑ring or gasket is still soft and undamaged, and the housing has no cracks, you can reuse it. However, we recommend replacing the seal if it has been compressed for more than a year. We sell seal replacement kits.
Q: How tight is “finger‑tight plus 1/8 turn”?
A: Tighten the coupling nut by hand as much as you comfortably can. Then use a wrench to turn it an additional 45 degrees (1/8 of a full turn). Do not force it past resistance.
Q: What is the most common cable gauge used with your connectors?
A: 20 AWG to 14 AWG (0.5mm² to 2.5mm²) covers about 80% of our orders. But we support from 26 AWG up to 10 AWG depending on the series.
Q: Do you offer on‑site training for installation?
A: For large projects, yes. Our technical team can provide a half‑day training session at your facility (or via video call). Contact us to discuss.

 86-0755-89999957
 colin@aohuadz.com